
I haven't been on my blog in a long time. I have decided to start writing tuts again. Lots of things have happened in my life since Christmas. My granddaughter, Jaydin, who lives in El Dorado, Arkansas, is only 4 and we almost lost her in February of this year. She was diagnosed with Guillain-Barré Syndrome. She was rushed to Children's Hospital in Little Rock, Arkansas where she was diagnosed just in time. She had lost all feeling from her waist down, she couldn't sit, stand or walk, and it was difficult for her to go to the bathroom. It was also starting affect her swallowing. Thank God the doctors were able to diagnose it in time. She was a very sick little girl and was in the hospital for over a month. Now she is a normal 4 year old girl again. She is hard for her mom and dad to keep up with her somedays.
Guillain-Barré syndrome is a disorder in which the body's immune system attacks part of the peripheral nervous system. The first symptoms of this disorder include varying degrees of weakness or tingling sensations in the legs. In many instances the weakness and abnormal sensations spread to the arms and upper body. These symptoms can increase in intensity until certain muscles cannot be used at all and, when severe, the patient is almost totally paralyzed. In these cases the disorder is life threatening - potentially interfering with breathing and, at times, with blood pressure or heart rate - and is considered a medical emergency. Such a patient is often put on a respirator to assist with breathing and is watched closely for problems such as an abnormal heart beat, infections, blood clots, and high or low blood pressure. Most patients, however, recover from even the most severe cases of Guillain-Barré syndrome, although some continue to have a certain degree of weakness.
Guillain-Barré syndrome can affect anybody. It can strike at any age and both sexes are equally prone to the disorder. The syndrome is rare, however, afflicting only about one person in 100,000. Usually Guillain-Barré occurs a few days or weeks after the patient has had symptoms of a respiratory or gastrointestinal viral infection. Occasionally surgery or vaccinations will trigger the syndrome.
After the first clinical manifestations of the disease, the symptoms can progress over the course of hours, days, or weeks. Most people reach the stage of greatest weakness within the first 2 weeks after symptoms appear, and by the third week of the illness 90 percent of all patients are at their weakest.
I have also had some medical problems and will have surgery on both my knees towards the end of the year. Not looking forward to that. I also have carpal tunnel in both wrists and tennis elbow in my right elbow. Will have surgery on them as soon as it is needed. I am trying to stick it out for now, don't want to have surgery any sooner than need be.
I am now working with Kittie of Kittie's Sinful Designz. Check out her blog HERE She has some awesome scrap kits and templates. Below is my first tut using Kittie's scrap kits and templates. Be on the lookout for more. Love your work Kittie.
Will keep you all updated on things as time warrants. Thanks for stopping by.
Glitter
Sunday, June 28, 2009

Sweet Escape Tut

Sweet Escape Tutorial
This is entirely my own idea. Any resemblance to any
other is totally and purely coincidental.
This tag was made with Paint Shop Pro 9.
I hope that you enjoy my tut.
Supplies Needed:
Scrap Kit Sweet Escape Summer Kit
by Kittie’s Sinful Designz found HERE
Template #4 by Kittie’s Sinful Temps and can
be found HERE
Mask WSL_Mask223 by
weescotslass and can be found
HERE
I am using the awesome art work by
Joel Adams. Please do not use these tubes
unless you have the proper license to do so,
and you have acquired the tubes legally from
CILM
Font of choice. I used Twilight 3 size 60 stroke 2. I used foreground black and background
with paper 2 from kit.
********************************
Okay, let's begin.
1. Open up your tubes, template and mask.
Hold down Shift D to duplicate the template.
Delete the copyright layer on the duplicate.
2. I like to work on a big area then resize
later, so go to image, canvas size, and
make the template 700 x 700.
3. Add a new raster layer, put on bottom,
and flood fill with white. If you want a
transparent tag then skip this step.
4. Select paper 5 and copy. Paste as a new
layer. Go to Layers, new mask layer,
from image. Select your mask from drop down
box. Invert mask data box not checked.
Merge group.
5. Select circle layer. Selections, select all,
float, defloat. Copy and paste paper 3.
Selections, invert, hit delete key on keyboard,
select none. Select circle layer again.
Selections, select all, float, defloat, modify,
expand by 2. Flood fill this layer with black,
select none. Or I have a new image 700 x 700
and I flood fill that with black. Then I copy
and paste this into the tag, selections,
invert, delete key, select none. Delete
original circle layer. Merge two circle
layers together. Add drop shadow of choice.
6. Select stitch layer. Selections, select all,
float, defloat. Copy and paste paper 4. Select, invert, delete key, select none.
Select stitch layer again.
Selections, select all, float,
defloat, modify, expand by 2. Copy and paste
black paper. Selections, invert,
delete key, select none.
Delete original stitch layer.
Merge 2 stitch layers together. Add drop
shadow of choice.
7. Select rectangle 1 layer. Selections,
select all, float, defloat. Copy and paste paper 2. Select, invert, delete key, select none.
Select rectangle 1 layer again. Selections,
select all, float, defloat, modify, expand by
2. Copy and paste black paper. Selections,
invert, delete key, select none.
Delete original rectangle 1 layer.
Merge 2 rectangle 1 layers together. Add drop
shadow of choice.
8. Select rectangle 2 layer. Selections,
select all, float, defloat. Copy and paste
paper 10. Selections, invert, delete key, select
none. Select rectangle 2 layer again.
Selections, select all, float, defloat, modify,
expand by 2. Copy and paste black.
Selections, invert, delete key,
select none. Delete original rectangle 2
layer. Merge 2 rectangle 2 layers together.
Add drop shadow of choice.
9. Select rectangle 3 layer. Selections, float,
defloat. Flood fill with color #fe4775 (or a new image 700 x 700 and flood fill with #fe4775 and copy and paste. Selections, invert, delete key, select none). Select none.
Select original rectangle 3 layer again.
Selections, select all, float, defloat, modify,
expand by 2, copy and paste with black.
Delete original rectangle 3 layer. Merge two
rectangle 3 layers. Add drop shadow of choice.
10. Click on Vertical Rectangle 1. Selections,
Select all, float, defloat, copy and paste paper 10. Selections, invert, delete key, select none.
Click on Vertical Rectangle 1 again.
Selections, select all, float, defloat, modify,
expand by 2, fill with black, invert, delete
key. Delete original Vertical Rectangle 1.
Merge two vertical rectangle 1 layers. Add
drop shadow of choice.
11. Click on Vertical Rectangle 2. Selections,
select all, float, defloat, copy and paste paper
2, selections, invert, delete key, select none.
Click on original Vertical Rectangle 2 again.
Selections, float, defloat, modify, expand by
2, copy and paste with black, selections,
invert, delete key, select none.
Delete original Vertical Rectangle 2.
Merge two vertical rectangle 2 layers. Add
drop shadow of choice.
12. Click on Vertical Rectangle 3. Selections,
select all, float, defloat, copy and paste #fe4775, select, invert, delete key. Click
on Vertical Rectangle 3 again. Selections,
select all, float, defloat, modify, expand by 2,
copy and paste with black, selections,
invert, delete key, select none. Delete original
Vertical Rectangle 3. Merge two vertical
rectangles. Add drop shadow of choice.
13. Click on Rectangle Frame. Selections,
select all, float, defloat, copy and paste
paper 8, selections, invert, delete key,
select none. Click on rectangle frame again.
Selections, float, defloat, modify, expand
by 2, copy and paste with black,
selections, invert, delete key, select none.
Delete original rectangle frame. Merge
two rectangle frames together.
14. Click on Rectangle Border. Selections,
select all, float, defloat, copy and paste
paper 2, selections, invert, delete key,
select none. Click on Rectangle Border
again. Selections, select all, float, defloat,
modify, expand by 2, copy and paste with black, selections, invert, delete key,
select none. Delete original Rectangle
Border. Merge 2 rectangle borders together.
Merge both Rectangle Frame and Rectangle
Border together. Add drop shadow of choice.
15. Click on Square Frame 1. Selections,
select all, float, defloat, copy and paste
paper 2, selections, invert, delete key,
select none. Click on Square Frame 1 again.
Selections, select all, float, defloat, modify,
expand by 2, copy and paste with black,
selections, invert, delete key, select none.
Delete original Square Frame 1. Merge two
square frames together.
16. Click on Inner Frame 1. Selections, select
all, float, defloat, copy and paste paper 6,
reduce size to your liking, move paper to
where the beginning of all rays are in the left
hand corner, selections, invert, delete key,
select none. Click on Inner Frame again.
Selections, select all, float, defloat, modify,
expand by 2, copy and paste with black,
selections, invert, delete key, select none.
Click on Inner Frame 1 again. Selections,
select all, float, defloat. Go to tube Joel Adams
LilJourney2008, mirror image before you copy, copy and paste onto tag. Position tube where you want it on top of left square, selections, invert, delete key, select none. Add drop shadow. Delete original Inner Frame. Merge all 3 layers of left square. Add drop shadow
of choice.
17. Click on Square Frame 2. Selections,
select all, float, defloat, copy and paste paper
2, selections, invert, delete key, select none.
Click on Square Frame 2 again. Selections,
select all, float, defloat, modify, expand by 2,
copy and paste with black, selections, invert,
delete key, select none. Delete original Square
Frame. Merge 2 square frames together.
18. Click on Inner Frame 2. Selections,
select all, float, defloat, mirror image paper 6,
copy and paste paper 6, resize to your liking,
move the paper to where the beginning of
the rays are in the right hand corner,
selections, invert, delete key, select none.
Click on Inner Frame 2 again. Selections,
select all, float, defloat, modify, expand
by 2, copy and paste with black, selections,
invert, delete key, select none.
Go to tube Joel Adams LilJourney2008,
mirror image so image is in original position, copy and paste onto tag. Position tube where you want it on top of right square, selections,
invert, delete key, select none. Delete original
Inner Frame 2. Merge all 3 layers. Add
drop shadow of choice.
19. Click on Inner Flower 1. Selections,
select all, float, defloat, copy and paste paper
4, selections, invert, delete key, select none.
Delete Inner Flower 1 original.
20. Click on Flower 1. Selections, select
all, float, defloat, copy and paste paper 10,
resize to your liking, position over flower ants,
selections, invert, delete key, select none. Click
on Flower 1 again. Selections, select all,
float, defloat, modify, expand by 2, copy and
paste with black, selections, invert, delete key,
select none. Delete Flower 1 original. Merge
Inner Flower 1 and Flower 1 together. Add
drop shadow of choice.
21. Click on Inner Flower 2. Selections,
select all, float, defloat, copy and paste
paper 4, selections, invert, delete key,
select none. Delete Inner Flower 2 original.
22. Click on Flower 2. Selections, select
all, float, defloat, copy and paste paper 9,
resize to your liking, position over flower ants,
selections, invert, delete key, select none.
Click on Flower 2 again. Selections, select
all, float, defloat, modify, expand by 2, copy
and paste with black, selections, invert,
delete key, select none. Delete Flower 2
original. Merge Inner Flower 2 and Flower
2 together. Add drop shadow of choice.
All layers of the template should now be
covered. On to embellishments.
23. Choose Clipped Flower 2. Resize
to your liking. Position at top of circle. Add
drop shadow of choice.
24. Choose Macaw 1. Delete branch macaw
is standing on. Resize to your liking.
Mirror image. Position on top of left
square to your liking.
Add drop shadow of choice.
25. Choose Macaw 2. Delete branch macaw
is standing on. Resize to your liking.
Position on top of right square to your
liking. Add drop shadow of choice.
26. Copy and paste Joel Adams LilPenny2008.
Resize and position to your liking. Add drop shadow of choice.
Add copyright and your watermark, if you
use one. Resize, with all layers checked,
80%. Add your name of choice.
I hope that you enjoyed my tutorial. If you
have any questions please ask. I would love
to see your results. You can email me at glitter59626@yahoo.com
I will put your results on my blog.

Friday, December 5, 2008
New Tut Available
I have a new tut, I hope that you enjoy it.
Shy Snowflakes

This tut was written by me (GlitterDeb) and any similarities to others is purely coincidental.
Supplies:
Template: Dezigns by Ali #144
HERE
www.DesignsbyAli.blogspot.com
Scrap Kit: Bittersweet Designs
Snowflakes and Snowmen
HERE
www.Designsbybittersweet.blogspot.com
Tube: Artwork by Elias Chatzoudis
HERE
www.mypsptubes.com
www.elias-design.gr
Do not use my tube unless you have the proper license to do so.
1. Open up template in PSP. Shift D to duplicate. Close out original.
2. Add new raster layer, flood fill white and send to bottom.
3. Close out all layers by clicking on eye in layers section, except for Raster layer 1. Copy Bittersweet Designs paper 3.
Selections>select all>selections>float>selections>defloat>paste as new layer>resize 50%>place where want>selections>invert>delete key on keyboard>selections>select none. Delete raster layer 1.
4. Open up raster layer 4 in layers sections.
Copy Bittersweet Designs paper 7.
Selections>select all>selections>float>selections>defloat>paste as new layer>selections>invert>delete key on keyboard>selections>select none. Delete raster layer 4.
Merge visible. Add drop shadow using these settings:
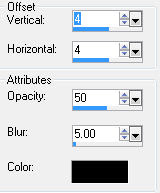
Close out this layer.
5. Open up raster layer 2.
Copy Bittersweet Designs paper 4.
Selections>select all>selections>float>selections>defloat>paste as new layer>resize 50%>place where you want>selections>invert>delete on keyboard>selections>select none. Delete raster layer 2.
6. Open up raster layer 3. Copy Bittersweet Designs paper 6.
Selections>select all>selections>float>selections>defloat>paste as new layer>selections>invert>delete on keyboard>selections>select none. Delete raster layer 3. Merge visible. Add drop shadow using same settings. Close out layer.
7. Open new image 600x600. Flood fill with metal steel gradient. Copy image.
8. Open raster layer 6.
Selections>select all>selections>float>selections>defloat>paste as new image>selections>invert>delete key on keyboard>selections>select none.
Delete raster layer 6. Add drop shadow with same settings.
9. Repeat step 8 on raster layer 7.
10. Repeat step 8 on raster layer 8.
Open up all merged layers now.
11. Open up tube. Copy and paste as new layer. Resize 80%. Place in-between squares where you want it.
Bring to top and add drop shadow with same settings.
12. Open up Bittersweet Designs Bow 6. Resize to 30%. Place where desired. Add drop shadow with same settings.
13. Open up Bittersweet Designs Wrap 10. Resize 30% then resize again 75%. Place under Bow 6. Add drop shadow with same settings.
14. Open up Bittersweet Designs Snowflake 4. Copy and paste as new image. Resize 40%. Place where wanted. Add drop shadow with same settings.
15. Open up Bittersweet Designs Snowman 3. Copy and paste as new image. Resize 25%. Place where wanted. Add drop shadow with same settings.
16. Open up Bittersweet Designs Felt Doodle 7. Copy and paste as new image. Resize 25%, rotate right 45, and place right above white layer, on left side.
17. Open up Bittersweet Designs Felt Doodle 6. Copy and paste as new image. Resize 25%, rotate right 45, and mirror. Place right above white layer, on right side.
18. Add copyright information and watermark. Merge all (flatten).
Save your tag as a template.
19. Add your name. I used Font Frosty size 48 stroke 1, foreground Black, background 119,13,13. Add drop shadow using same settings.
I hope that you enjoyed this tut.
Shy Snowflakes

This tut was written by me (GlitterDeb) and any similarities to others is purely coincidental.
Supplies:
Template: Dezigns by Ali #144
HERE
www.DesignsbyAli.blogspot.com
Scrap Kit: Bittersweet Designs
Snowflakes and Snowmen
HERE
www.Designsbybittersweet.blogspot.com
Tube: Artwork by Elias Chatzoudis
HERE
www.mypsptubes.com
www.elias-design.gr
Do not use my tube unless you have the proper license to do so.
1. Open up template in PSP. Shift D to duplicate. Close out original.
2. Add new raster layer, flood fill white and send to bottom.
3. Close out all layers by clicking on eye in layers section, except for Raster layer 1. Copy Bittersweet Designs paper 3.
Selections>select all>selections>float>selections>defloat>paste as new layer>resize 50%>place where want>selections>invert>delete key on keyboard>selections>select none. Delete raster layer 1.
4. Open up raster layer 4 in layers sections.
Copy Bittersweet Designs paper 7.
Selections>select all>selections>float>selections>defloat>paste as new layer>selections>invert>delete key on keyboard>selections>select none. Delete raster layer 4.
Merge visible. Add drop shadow using these settings:

Close out this layer.
5. Open up raster layer 2.
Copy Bittersweet Designs paper 4.
Selections>select all>selections>float>selections>defloat>paste as new layer>resize 50%>place where you want>selections>invert>delete on keyboard>selections>select none. Delete raster layer 2.
6. Open up raster layer 3. Copy Bittersweet Designs paper 6.
Selections>select all>selections>float>selections>defloat>paste as new layer>selections>invert>delete on keyboard>selections>select none. Delete raster layer 3. Merge visible. Add drop shadow using same settings. Close out layer.
7. Open new image 600x600. Flood fill with metal steel gradient. Copy image.
8. Open raster layer 6.
Selections>select all>selections>float>selections>defloat>paste as new image>selections>invert>delete key on keyboard>selections>select none.
Delete raster layer 6. Add drop shadow with same settings.
9. Repeat step 8 on raster layer 7.
10. Repeat step 8 on raster layer 8.
Open up all merged layers now.
11. Open up tube. Copy and paste as new layer. Resize 80%. Place in-between squares where you want it.
Bring to top and add drop shadow with same settings.
12. Open up Bittersweet Designs Bow 6. Resize to 30%. Place where desired. Add drop shadow with same settings.
13. Open up Bittersweet Designs Wrap 10. Resize 30% then resize again 75%. Place under Bow 6. Add drop shadow with same settings.
14. Open up Bittersweet Designs Snowflake 4. Copy and paste as new image. Resize 40%. Place where wanted. Add drop shadow with same settings.
15. Open up Bittersweet Designs Snowman 3. Copy and paste as new image. Resize 25%. Place where wanted. Add drop shadow with same settings.
16. Open up Bittersweet Designs Felt Doodle 7. Copy and paste as new image. Resize 25%, rotate right 45, and place right above white layer, on left side.
17. Open up Bittersweet Designs Felt Doodle 6. Copy and paste as new image. Resize 25%, rotate right 45, and mirror. Place right above white layer, on right side.
18. Add copyright information and watermark. Merge all (flatten).
Save your tag as a template.
19. Add your name. I used Font Frosty size 48 stroke 1, foreground Black, background 119,13,13. Add drop shadow using same settings.
I hope that you enjoyed this tut.
Wednesday, November 19, 2008
Winter Wishes tut

Winter Wishes
This tut is entirely my own design (GlitterDeb), any resemblance to any others is purely coincidental.
Supplies needed:
Template -- Dezigns by Ali #93 found HERE
Scrap kit -- Winter Wishes available at
The Creative Box HERE
I used the artwork of the fabulous Daniel Esparza available through Creative Image Licensing and Management (CILM) You can find his artwork HERE
Jasc Paint Shop Pro
1. Open up the template in Paint Shop Pro.
2. Shift D to duplicate template. Close out original template.
3. New Raster Layer, flood fill with white, and send to the bottom.
4. In layers box, on the right hand side, close out all raster layers except for raster 6, by clicking on the eye.
5.Highlight raster 6. Open up BFK_ paper12 from kit. Copy.
6. Selections - select all - float - defloat - paste as new layer - resize paper by 110%, making sure resize all layers is UNCHECKED - selections - invert - delete key on keyboard - selections - select none. Delete original raster layer 6. Add drop shadow.
7. Highlight raster layer 1. Open up BFK_paper5 from kit. Copy.
8. Selections - select all - float - defloat - paste as new layer - resize paper by 110%, making sure resize all layers is UNCHECKED - selections - invert - delete key on keyboard - selections - select none. Delete original raster layer 1. Add drop shadow.
9. Highlight raster layer 8. Open up BFK_paper13 from kit. Copy.
10. Selections - select all - float - defloat - paste as new layer - resize paper by 110%, making sure resize all layers is UNCHECKED - selections - invert - delete key on keyboard - selections - select none. Delete original raster layer 8. Add drop shadow.
11. Highlight raster layer 2. Open up BFK_paper 4. Copy.
12. Selections - select all - float - defloat - paste as new layer - selections - invert - delete key on keyboard - selections - select none. Delete original raster layer 2. Add drop shadow.
13. Highlight raster layer 4. Use paper 13 again. Copy.
14. Selections - select all - float - defloat - paste as new layer - selections - invert - delete key on keyboard - selections - select none. Delete original raster layer 4. Add drop shadow.
15. Highlight raster 3. Open up BFK_paper2. Paste, arrange where you want it, where you like the snowflakes.
16. Selections - select all - float - defloat - paste as new layer - selections - invert - delete key on keyboard - selections - select none. Delete original raster layer 3. Add drop shadow.
17. Highlight raster layer 5. Use paper 13 again. Copy.
18. Selections - select all - float - defloat - paste as new layer - selections - invert - delete key on keyboard - selections - select none. Delete original raster layer 5. Add drop shadow.
All layers of template should now have a paper layer and all original template pieces should be deleted. Put a drop shadow on all raster layers.
19. Open up tube of choice, copy. Click on rectangle on the left, Selections - select all - float - defloat - paste as new layer - selections - invert - delete key on keyboard - selections - select none. Add drop shadow.
20. Open up BFK_ball1. Copy and paste as new layer. Resize 45%. Copy this ball and paste as new layer 2 times. Leave 1 ball straight up, rotate one ball 45 to the left, and rotate one ball 65 right. Add drop shadow on all three. Arrange at the bottom of the tree to your liking.
21. Open up BFK_cookie1, copy and paste as new layer. Resize to 25%, arrange at the top of the tree. Add drop shadow.
22. Open up BFK_snowman1, copy. Click on the inside of the tree, Selections - select all - float - defloat - paste as new layer - resize to 50% - arrange inside of tree - selections - invert - delete key on keyboard - selections - select none. Add drop shadow.
23. Open up BFK_wordart2, copy. Paste as new layer, resize to 40%. Arrange where you like, add drop shadow.
24. Open up BFK_bow3, copy. Paste as new layer, resize to 40%, arrange between boxes. Add drop shadow.
25. Add copyright, URL, and watermark. Don’t forget to add your license number if using a pay artist.
26. Merge all (flatten). Save as your template.
27. Add your name, or name of choosing, arrange where you like, and add drop shadow. Font I used is Candia Script SSK size 48 stroke 1. Foreground color Black. Background color #e563a1.
28. Save and you are done.
I hope that you enjoyed this tut as much as I did making it.
Can find the scrap kit here
I forgot to post a link to where you can find the awesome scrap kit I used in my tut, so here it is: here

Season’s Greetings
This tutorial is entirely my design (GlitterDeb), any resemblance to any other is purely coincidence.
Supplies Used:
Scrap kit used is PTU Winter Wishes from The Creative Box, thanks so much for letting me use this awesome kit.
Tube of choice. I used the art of Creo Creddies from www.creographix.at
Mask used was: Candyass_seasons greetings mask 1.
Be sure to save often so you don’t lose your work.
Start out by opening a new canvas of 600 x 600, will resize later.
Copy and paste paper of choice as new layer, I used paper 12 from the kit.
Open your mask in Paint Shop, go to Layers, new mask layer, from image.
Merge group.
Drop shadow used throughout:
Open up BFK_frame2, copy and paste as new layer. Resize by 150%.
Take your magic wand, and while on frame layer click inside the frame. Go to Selections, modify, expand by 12.
Copy and paste paper BFK_12.
Selections, invert, delete key on keyboard, select none.
Place this layer under the frame layer.
Copy and paste tube as new layer and place on top of paper but under the frame. If tube is too big resize.
Open BFK_wrap3 and copy and paste as new layer. Enlarge by 115% and place at the bottom of the frame.
Add your drop shadow to frame, tube and ribbon.
Open up BFK_ball1. Copy and paste as new layer. Resize to 40%. Copy and paste ball as new layer twice. Place balls in the lower left corner, arrange to your liking. Rotate one ball right 45, and one left 65. Add your drop shadow.
Open up BFK_flower3. Copy and paste as new layer. Resize to 50. Copy and paste as new layer 1 time. Place in upper right hand corner or to your liking. Add drop shadow.
Add your copyright and watermark if used.
Merge all. Resize to 85%. Save here for your template.
Add name in lower right corner, or to your liking. I used the font:
Roselyn size 48
Stroke 1
Foreground color: Black
Background color: #f1899b
Save and your done.
I hope that you have enjoyed my tut.
Tuesday, November 18, 2008
Hello Everybody
Hello everyone, and welcome to Glitter's Spot. I have just joined the world of bloggers. LOL
I discovered the world of PSP a little over a year ago and joined several groups and started requesting tags from those groups. I really like the diversity of the different artists out there and I was amazed by how the taggers would take those artists work and create signature tags with them. So I became a Siggy Piggy and requested everything that I could. A junkie was created.
I started to get the itch to try my hand at making these wonderful tags but I could not afford the program for it. Then a wonderful friend in one of my groups gave me the program, thanks so much Yvonne, and I started learning how to operate it.
Another wonderful friend help me with easy animations, thanks so much Lisa.
This was at the beginning of June of this year. I started making tags, at first I just put things together, and some of them were rather ugly. Then I discovered that there were tutorials out there to help you with making tags, so I tried following them. But most of the tuts out there were for people who already had a working knowledge of PSP and it was so confusing to me. Especially the tuts for animation, I was totally lost. But I kept at it, and tried different things, and eventually I got the hang of it. I remember one particularly hard animated tut that I wanted to try, but I just couldn't get the hang of it. It just wouldn't turn out right, but everyone kept encouraging me so I kept trying. Eventually I figured out what I was doing wrong and the tag turned out beautifully.
There is still so much to learn and I learn something new everyday. I started making better and better tags. So I tried to make some tags out of my own imagnation and got pretty good at that. I had lots of requests for my tags, which really boosted my morale.
Then I found the add from The Creative Box looking for tut writers. On a whim I decided to send in some samples of my work and I was accepted. I was really surprised and thankful that they decided to take a chance on me. So I have ventured into the world of tutorial writing. I have finished my first tutorial and I think that it turned out rather well, but then again I am biased. LOL I hope to continue writing tuts and I hope that others can enjoy them as well.
This is where I will post my tuts, so keep a watch out for them. I hope that you enjoy using the tuts as much as I enjoy writing them.
Thanks for checking out my spot.
I discovered the world of PSP a little over a year ago and joined several groups and started requesting tags from those groups. I really like the diversity of the different artists out there and I was amazed by how the taggers would take those artists work and create signature tags with them. So I became a Siggy Piggy and requested everything that I could. A junkie was created.
I started to get the itch to try my hand at making these wonderful tags but I could not afford the program for it. Then a wonderful friend in one of my groups gave me the program, thanks so much Yvonne, and I started learning how to operate it.
Another wonderful friend help me with easy animations, thanks so much Lisa.
This was at the beginning of June of this year. I started making tags, at first I just put things together, and some of them were rather ugly. Then I discovered that there were tutorials out there to help you with making tags, so I tried following them. But most of the tuts out there were for people who already had a working knowledge of PSP and it was so confusing to me. Especially the tuts for animation, I was totally lost. But I kept at it, and tried different things, and eventually I got the hang of it. I remember one particularly hard animated tut that I wanted to try, but I just couldn't get the hang of it. It just wouldn't turn out right, but everyone kept encouraging me so I kept trying. Eventually I figured out what I was doing wrong and the tag turned out beautifully.
There is still so much to learn and I learn something new everyday. I started making better and better tags. So I tried to make some tags out of my own imagnation and got pretty good at that. I had lots of requests for my tags, which really boosted my morale.
Then I found the add from The Creative Box looking for tut writers. On a whim I decided to send in some samples of my work and I was accepted. I was really surprised and thankful that they decided to take a chance on me. So I have ventured into the world of tutorial writing. I have finished my first tutorial and I think that it turned out rather well, but then again I am biased. LOL I hope to continue writing tuts and I hope that others can enjoy them as well.
This is where I will post my tuts, so keep a watch out for them. I hope that you enjoy using the tuts as much as I enjoy writing them.
Thanks for checking out my spot.
Subscribe to:
Posts (Atom)

